You will need:
green clay for lettuce
flesh-colored clay for turkey
red clay for cranberries
artist pastels in brown, orange and gold (or whatever combination will give you a nice golden-brown color
Gloss Varnish
wad of aluminum foil
paintbrush (to spread pastels)
razor blade (to shave pastels)
pic (to help move small items
Platter for turkey--make or buy.

Start by pulling off pieces of the green, and shredding slightly in your fingers to achieve a 'torn' lettuce look. Arrange around the platter. You won't need to fill the center, as the turkey will set there.

Go all the way around the platter. I occasionally use Liquid Sculpey as a 'glue' to hold this to the platter, but don't stress if you don't have any. Once everything is baked, if it comes off the platter a spot of white glue will hold it firmly in place.

Next, take your flesh color and mold it into the shape of a breast of turkey. Note that it will be larger and fatter at the front. Wad the aluminum foil slightly, and use it to texture the turkey by pressing lightly into the ball. Not sure how big a ball to make? Just pluck of a chunk and form it--then if it is too small, add more and reform. Too big, just pinch off some of it and reform. Turkeys come in many sizes!

Pick off two smaller pieces from your clay, and form into drumsticks. I like to make it look a little like bone at the end, but this is of course your choice. Texture the legs also, and then stick them to the side of the turkey. Position them like you would see them on a baked turkey.

Next--wings! It's easiest to make two small tubes and bend them in the center. Then, press them to the side of the turkey above the legs. Texture these also with the foil. I like to shape them a bit more once they are on the turkey.

Make sure your turkey is going to cover all the garnish on the tray. Then, remove it, and get ready to use the pastels.

Shave off a small amount of each color, and blend until you have the right shade for a cooked turkey. If you aren't sure, look in a cookbook! There are always great pictures there to show you how it would look in real life. I also shaved off a little of the dark brown to use as a highlight, so my turkey wasn't all one color. Use the paintbrush to put the pastels onto the turkey.
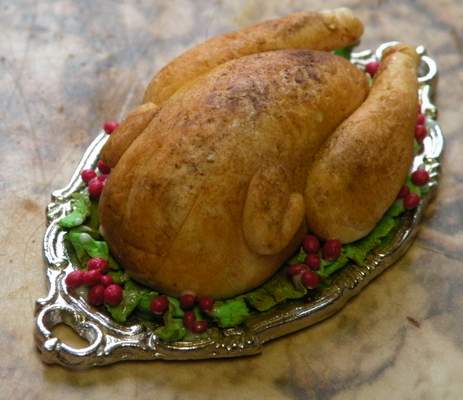
Once it is done to your satisfaction, set it onto the tray. Now, take the red for the cranberries and form small balls. Place them decoratively around the turkey. Bake your turkey according to the directions on your clay packet. Allow to cool.

This turkey hasn't been baked yet, but this gives you an idea of what it will look like.
Once baked, lightly brush with gloss varnish. I use Liquitex Gloss varnish. This will give it a 'greasy' cooked look. As soon as I finish some other items, I'll bake mine and add a picture here!
-------------------------------------------------------------
For more minis by Julie Old Crow, visit:
eBay: http://shop.ebay.com/merchant/julieoldcrow
Website: http://www.julieoldcrow.com


14 comments:
This tutor is very helpful!
thanks! Caterina
Great tutorial! Thanks for sharing!
~Gaye
oh i really like this blog :)
I don't make miniature food...I prefer to buy it...but I loved looking at the tutorial, gives me an insight into how other people work...thank you!
Regards, Linda
I've been wondering how these were made! Thanks so much for sharing your tutorial! I just might have to make one for Christmas?
Wonderful tutorial! The turkey looks good enough to eat. Makes me wish our Canadian Thanksgiving wasn't already over. Happy Thanksgiving to all my American friends!
I just did this and I'm so happy with the results, they came out great!! Very fun to do. Thanks for posting and Happy Holidays!!!
Great tutorial! happy thanksgiving!
Great tutorial! Thank you so much for sharing :)
this tutorial is great ! happy thanksgiving !
Hi, Your turkey looks great! good enough to eat so i'd like a piece of the breast please.
Thank you so much for sharing your tuts. I just became a follower and am looking forward to seeing more.
Just a small hit for lettuce or making lettuce salads. Plastic leaves cut into small random shapes. If you don't have any old plastic plant to cut up - dollar store or thrift store.
What's next? I am looking forward to your next tutorial. Also does anyone do TTT? if so please post your link, my g-kids and I would love to see your mini items.
Yum
Post a Comment