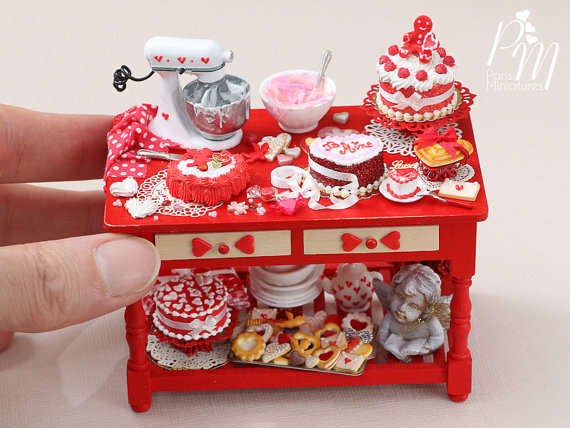
Thursday, November 26, 2009

Happy Thanksgiving ~ Sarah Maloney


For more minis by Sarah Maloney, visit:

Wednesday, November 25, 2009

Tutorial: Turkey ~ Julie Old Crow


You will need:
green clay for lettuce
flesh-colored clay for turkey
red clay for cranberries

artist pastels in brown, orange and gold (or whatever combination will give you a nice golden-brown color
Gloss Varnish
wad of aluminum foil
paintbrush (to spread pastels)
razor blade (to shave pastels)
pic (to help move small items

Platter for turkey--make or buy.


Start by pulling off pieces of the green, and shredding slightly in your fingers to achieve a 'torn' lettuce look. Arrange around the platter. You won't need to fill the center, as the turkey will set there.


Go all the way around the platter. I occasionally use Liquid Sculpey as a 'glue' to hold this to the platter, but don't stress if you don't have any. Once everything is baked, if it comes off the platter a spot of white glue will hold it firmly in place.


Next, take your flesh color and mold it into the shape of a breast of turkey. Note that it will be larger and fatter at the front. Wad the aluminum foil slightly, and use it to texture the turkey by pressing lightly into the ball. Not sure how big a ball to make? Just pluck of a chunk and form it--then if it is too small, add more and reform. Too big, just pinch off some of it and reform. Turkeys come in many sizes!


Pick off two smaller pieces from your clay, and form into drumsticks. I like to make it look a little like bone at the end, but this is of course your choice. Texture the legs also, and then stick them to the side of the turkey. Position them like you would see them on a baked turkey.


Next--wings! It's easiest to make two small tubes and bend them in the center. Then, press them to the side of the turkey above the legs. Texture these also with the foil. I like to shape them a bit more once they are on the turkey.


Make sure your turkey is going to cover all the garnish on the tray. Then, remove it, and get ready to use the pastels.


Shave off a small amount of each color, and blend until you have the right shade for a cooked turkey. If you aren't sure, look in a cookbook! There are always great pictures there to show you how it would look in real life. I also shaved off a little of the dark brown to use as a highlight, so my turkey wasn't all one color. Use the paintbrush to put the pastels onto the turkey.

Once it is done to your satisfaction, set it onto the tray. Now, take the red for the cranberries and form small balls. Place them decoratively around the turkey. Bake your turkey according to the directions on your clay packet. Allow to cool.


This turkey hasn't been baked yet, but this gives you an idea of what it will look like.

Once baked, lightly brush with gloss varnish. I use Liquitex Gloss varnish. This will give it a 'greasy' cooked look. As soon as I finish some other items, I'll bake mine and add a picture here!

Note: I buy all of my platters from eBay (where else!) and you can get some very nice platters in metal, wood, or even ceramic. Just shop around. Or--make your own platters from clay.

-------------------------------------------------------------

For more minis by Julie Old Crow, visit:
Blog: http://yummyminiaturefoods.blogspot.com
eBay: http://shop.ebay.com/merchant/julieoldcrow
Website: http://www.julieoldcrow.com 

Tuesday, November 24, 2009

Thanksgiving Treats ~ Betsy Niederer

Sweet potatoes, Marshmallow and Pumpkin Pie


Monday, November 23, 2009

Pumpkin Pie ~ Sarah Maloney

A delightful pumpkin pie decorated with black currants and autumnal leaves and presented with a dollop of cream and a fondant pumpkin.


Sunday, November 22, 2009

Pumpkin Pie ~ After Dark Miniatures

Saturday, November 21, 2009

Pumpkin Bundt Cake ~ Melanye Kimbrough


Friday, November 20, 2009

Autumn Cake ~ Emmaflam & Miniman

Chocolate cake decorated with marzipan pumpkins and chocolate autumn leaves ...